2015/12/21

Android: Checkstyle

ファイルの一部分をチェック対象外にする

Checkstyle - Filtersのsuppressを参照.

まず, checkstyleのconfigファイルに下記FileContentsHolderSuppressionCommentFiltermoduleを設定.

<module name="Checker">
  <module name="TreeWalker">
    ...
    <module name="FileContentsHolder"/>
  </module>
  <module name="SuppressionCommentFilter"/>
</module>

これで// CHECKSTYLE:OFFのコメントから// CHECKSTYLE:ONのコメントまでの間を, Checkstyleのチェック対象外として指定できる.

// CHECKSTYLE:OFF
for (int i = 0, len = array.length; i < len; i++) {
  ...
}
// CHECKSTYLE:ON

警告抑止設定の外部ファイル化

Suppression情報は外出しできる.

checkstyleのconfigファイルに下記SuppressionFiltermoduleを設定.
valueにsuppressions定義ファイルのパスを指定する.

<module name="SuppressionFilter">
  <property name="file" value="./app/config/checkstyle/suppressions.xml"/>
</module>

suppressions.xmlのexample.

<?xml version="1.0"?>

<!DOCTYPE suppressions PUBLIC
    "-//Puppy Crawl//DTD Suppressions 1.1//EN"
    "http://www.puppycrawl.com/dtds/suppressions_1_1.dtd">

<suppressions>
  <suppress checks="MethodName" files="Hoge.java" />
</suppressions>

Checkstyleの解析結果をHTML形式で出力する

Generate Checkstyle HTML report with Gradleを参照.

Checkstyle pluginのreportsはhtml形式をサポートしていないのでxslを使ってstylesheetをあてる.

task checkstyle(type: Checkstyle) {
    configFile = file("$projectDir/config/checkstyle/checkstyle.xml")
    source 'src/main/java'
    include '**/*.java'
    exclude '**/gen/**'
    classpath = files()
    reports {
        xml {
            destination "$buildDir/reports/checkstyle/report.xml"
        }
    }
}

task checkstyleReport << {
    if (file("$buildDir/reports/checkstyle/report.xml").exists()) {
        ant.xslt(in: "$buildDir/reports/checkstyle/report.xml",
                style:"$projectDir/config/checkstyle/checkstyle.xsl",
                out:"$buildDir/reports/checkstyle/checkstyle.html"
        )
    }
}

gradle.taskGraph.afterTask {Task task, TaskState state ->
    if(state.failure) {
        if (task.name in ['checkstyle']) {
            checkstyleReport.execute()
        }
    }
}

以上.

2015/12/15

Android: AppiumでUI Testing

本稿は下記を参考にしています.

Appiumは各ベンダ(Google, Apple)がリリースしているUI Testing Frameworkをラップした統一APIを提供してUIテストを可能にするもの.
これにより, iOSのテストケースをAndroidでも流用できるといったアドバンテージがある
(UI構成が違えばテストケースの流用は難しい)

AppiumがラップするUI Testing Frameworkは下記.

  • iOS: Apple’s UIAutomation
  • Android 4.2+: Google’s UiAutomator
  • Android 2.3+: Google’s Instrumentation.

確認環境は下記.

  • Android 5.0
  • Appium 1.4.13

注意点

Appiumはプロダクトのバイナリ(.apk)があればテスト可能だが, テスト対象アプリで準備が必要な点がある.
Android4.4以降でWebViewをテストする場合はWebViewのデバッグオプションが, Android4.1以前で動作する場合はINTERNETパーミッションが必要になる.

WebView

Android4.4からWebViewはChromiumベースに変更された.
テスト対象アプリをKitKat以上 かつ WebViewをテスト対象に含む場合は下記を実施する必要がある.

// WebViewをテストする場合は下記をWebView使用前に実施しておくこと.
WebView.setWebContentsDebuggingEnabled(true);

参考:

- Remote Debugging on Android with Chrome
- Appium - AUTOMATING HYBRID ANDROID APPS

Apptium or Selendroid

Androidのバージョンによって動作するモードが異なる.

  • Android 4.2+: Google’s UiAutomator
  • Android 2.3+: Google’s Instrumentation. (Instrumentation support is provided by bundling a separate project, Selendroid)

これはAppiumが使用するライブラリのサポート範囲に依存している.
Selendroid modeで確認する場合, テスト対象のアプリにINTERNETパーミッションを宣言する必要がある.

<uses-permission android:name="android.permission.INTERNET" />

参考:

- Appium - ANDROID SUPPORT
- Appium - Notes

Launch Appium server

Appiumをダウンロードする.
今回はAppium 1.4.13を選択. ダウンロードしたらAppiumを起動.

参考: Appium GUI

Appium GUIで下記を実行してAppiumサーバを起動する.

  1. Android Setting(Droid icon) - App Path にテスト対象のapkのパスを入力
  2. Android Settingを閉じて Launch

TestCase

Appiumはテスト対象アプリの操作に特化したツールであるため, アサーションなどの機構は別で用意する必要がある(Productionコードは必要無い).
今回は別プロジェクト(module)を作成してJUnitでテストスクリプトを書いた.

テストコードに必要なライブラリは下記.

dependencies {
    // Appiumクライアントライブラリを利用するための宣言
    testCompile 'io.appium:java-client:2.1.0'
}

テストの実行結果はbuild/reports/testsに出力される.

補足: io.appium:java-client:は3.3.0がリリースされていたが, hamcrestなど依存ライブラリが変わっている様子. 今回は動作確認目的のため2.1.0で実施.

以上.

AWS EC2 + bugspotsでバグ予測

AWS EC2にbugspotsの実行環境を構築した際のメモ.

Setup

試したEC2インスタンス(Amazon Linux)はt2.microの無料枠を使用.
EC2インスタンスを作成したらssh接続.
あらかじめインストールされているRubyバージョンを確認 (今回はruby 2.0.0p647で確認).

$ ruby -v

gitもインストールしておく (今回はgit 2.4.3で確認).

$ sudo yum install git

次にbugspotsのインストールで必要になるDevelopment toolcmakeをインストール.
(cmakeのバージョンは2.8.12)

$ sudo yum -y groupinstall "Development tools"
$ sudo yum install cmake

bugspotsをインストール.

$ sudo gem install bugspots

bugspots

git cloneでレポジトリを複製したらgitレポジトリでbugspotsコマンドを実行すればok.


# コミットログに"fix"を含むものを対象とする
$ bugspots . 

# コミットログが"bug"から始まるものを対象とする
$ bugspots -r "/^*bug/" .

より頻繁にbugfixされているソースコードほど高い値(Hotspots)になるアルゴリズム.
この記事が詳しい.

以上.

2015/12/09

Android:GradleでBuildConfigに定数追加する際のハック

Build variant毎に定数の値を変えたい場合, 下記のようにすることで実現できる.

productFlavors {
  development {
    buildConfigField "boolean", "PRODUCTION_MODE", "false"
  }
  production {
    buildConfigField "boolean", "PRODUCTION_MODE", "true"
  }
}

しかし, この例ではプロダクションモードを判定する下記のようなif文を書いた場合にAndroidStudioがwaningをあげてくる.

// これだとBuild variantによってPRODUCTION_MODEが常に
// true/false固定となり, AndroidStudioがシンプル化をすすめてくる. 
if (BuildConfig.PRODUCTION_MODE) { ... }

Build variantを変えるとtrue/falseが変わるため, コードをシンプル化(true/falseに置き換え)することはできない.
warningを放置すると誤ってシンプル化される恐れもある. 暫定的にwarningを回避する方法は下記.

// 下記コメントを記載することでwarning抑止できる
// noinspection ConstantConditions,PointlessBooleanExpression
if (BuildConfig.PRODUCTION_MODE) { ... }

もしくは, AndroidStudioをだます下記の方法でこれに対処することができる.

productFlavors {
  development {
    buildConfigField "boolean", "PRODUCTION_MODE", "Boolean.parseBoolean(\"false\")"
  }
  production {
    buildConfigField "boolean", "PRODUCTION_MODE", "Boolean.parseBoolean(\"true\")"
  }
}

Boolean.parseBoolean(String)を使うことでwarningが出なくなる.
(逆に言うとシンプル化できるところでwarningが出ていない)
後者はハックであるため今後も保証されたものではないことに注意.

確認したAndroidStudioのバージョンは1.5.1.

参考: Why does the BuildConfig class use Boolean.parseBoolean() instead of literal values?

以上.

2015/11/04

Dagger2でRealmConfigurationの切り替え

はじめに

Realmを使ったアプリで本番用とテスト用とで*.realmファイルを分ける方法を試した.

RenamingDelegatingContextを使ってファイル名にデバッグ用prefix(“test_”等)を付けるとか, テストではRealmインスタンスを直接操作する方法があるが, 今回は下記の理由からDI(Dagger2)で頑張る方法を採用した.

  1. Realmのmigrationテストやencryptテストにも備えて, RealmConfigurationレベルでカスタムしたい.
  2. Realmインスタンスを直接操作せず, できるだけ本番に近いアーキテクチャでテストしたい.

今回の例ではわかりやすく, *.realmファイル名を本番用とテスト用とで分けることを題材にしている.
ただし, 本番用プロダクトへの影響を懸念するならtestApplicationIdでユーザランドを分けてしまうのが無難.

ApplicationIdについて, Google APIやWeb Service系でパッケージ名を一種の認証識別情報としているものがあったり, アプリ間連携で呼出し元のパッケージ名が重要な意味を持つ設計思想もあったりで, パッケージ名変更するのも気を付けないといけないポイントがいくつかある.
とはいえ, ApplicationIdを分けないと本番用/デバッグ用を完全に分離するのが困難なケース(後述)もあるため, その点には注意したい.

今回はこちらのレポジトリからの抜粋となる.

Realm factory

Realmのインスタンス生成は専用のFactoryクラスRealmFactory内にカプセル化する.

public class RealmFactory {
  public Realm getRealm() {
    if (realmConfiguration == null) {
      DiContainer.getInstance().getApplicationComponent().inject(this);
    }

    return Realm.getInstance(realmConfiguration);
  }
}

このクラスはRealmConfigurationの生成責務も持ち, テスト専用のRealmConfigurationを生成するメソッドが実装される.

また, Configurationの異なるRealmがアプリ内に生成されるのを避けるためにRealmFactoryはSingletonオブジェクトにする.

  // 製品用RealmConfigurationの生成
  public static RealmConfiguration newRealmConfiguration(@NonNull Context context) {
    return new RealmConfiguration.Builder(context)
        .name(REALM_FILE)
        .schemaVersion(REALM_SCHEME_VERSION)
        .migration(new RealmMigrator())
        .build();
  }

  // デバッグ用RealmConfigurationの生成
  @VisibleForTesting
  public static RealmConfiguration newDebugRealmConfiguration(@NonNull Context context, @Nullable String fileName) {
    return new Builder(context)
        .name((fileName == null || fileName.length() == 0) ? "test_" + REALM_FILE : fileName)
        .schemaVersion(REALM_SCHEME_VERSION)
        .migration(new RealmMigrator())
        .build();
  }

RealmConfigurationを後からDIでInjectするためにfactoryメソッドの公開範囲はpublicとしておく.

Rebuild component

よくあるApplication.onCreateでObject graphを構築する場合を考える.
コードの中で登場するDiContainerはObject graphを管理するコンポーネント.
Androidのコンポーネントをテスト環境から疎にするためApplication経由ではなくDiContainerを経由させる.

public class App extends Application {
  @Override
  public void onCreate() {
    super.onCreate();

    // よくある方法を使う
    DiContainer.getInstance().setApplicationComponent(
        DaggerApplicationComponent.builder()
            .applicationModule(new ApplicationModule(this))
            .build());
  }
}

Unit Test実行時にはデバッグ用のObject graphに再構築する必要がある.
デバッグ用にRealmConfigurationを作成するAPIは既に用意してあるため, DIでこれを差し替える方法を実装していく.

まずはRealmConfigurationをinjectするための本番用moduleを定義する.

@Module
public class ModelModule {
  @Provides @Singleton
  RealmConfiguration provideRealmConfiguration(@NonNull Context context) {
    RealmConfiguration configuration = RealmFactory.newRealmConfiguration(context);
    return configuration;
  }
}

続いてデバッグ用moduleを定義.

public class DebugModelModule extends ModelModule {
  @Provides @Singleton
  RealmConfiguration provideRealmConfiguration(@NonNull Context context) {
    RealmConfiguration configuration 
        = RealmFactory.newDebugRealmConfiguration(context, null /* test_ prefixed */);
    return configuration;
  }
}

あとはObject graphをテスト前に再構築すればデバッグ用のRealmConfigurationがinjectできるようになる.

public class DebugHelper {
  public static void setupDiContainer() {
    DiContainer.getInstance().setApplicationComponent(
        DaggerApplicationComponent.builder()
            .modelModule(
                new DebugModelModule())
            .applicationModule(
                new ApplicationModule(
                    (App) InstrumentationRegistry.getTargetContext().getApplicationContext()))
            .build());
    RealmFactory.getInstance().deprecateConfigration();
  }
}

他にもSchemeVersionを指定するテストであったり, encryptしてのテストなども同じようにmoduleを用意すれば事足りる.

Unit Testの実行前にはApplication.onCreateが実行される.
そのため, Object graphは一旦本番用のRealmConfigurationで初期化されることになる.
Unit TestのsetupでRealmConfigurationが差替えられるのはその後になるため, Application.onCreate内でRealmにアクセスするようなケースがある場合は対策を打つ必要がある.
(その場合はtestApplicationIdでパッケージを分ける方策を探るのが無難だと思う)

以上.

2015/10/17

Hubot on Heroku

What’s Hubot

GitHub製のBOT. CofeeScriptで書かれており, Node.jsで動作する. MITライセンスなOSS.
独自のscriptを定義でき, adapterの機構で様々なチャットシステムにも対応できる. ChatOps.
HubBotを動作させるにはRedisが必要.

Install Hubot.

Hubotを始める方法はこちらに詳しく書かれている.
HubotはNode.jsで動作するためNode+npmの環境を用意しておく必要がある.

HubotはYeoman generatorからinstallする.

# アクセス権限が必要であればsudoで.
npm install -g yo generator-hubot

次に, Hubot用のディレクトリを作成して, そこで新しいHubotインスタンスを作成する.
いくつか質問されるので回答する.

# 今回はボットの名前をmarimoで作成
mkdir marimo
cd marimo
yo hubot

# Bot adapterはとりあえずcompfireで
? Owner: MatsumuraYuki <xxx@gmail.com>
? Bot name: marimo
? Description: A simple helpful robot for your Company
? Bot adapter: campfire

実行が成功するとHubotに必要なrediaも同時にインストールされている.
Botの雛形が出来上がったのでgit repositoryにcommitしておく.

git init
git add .
git commit -m "Initial commit. Hello marimo!"

ローカルでmarimoを動かしてみる.

# shell adapterを使ってHubotを起動
bin/hubot

errorメッセージが表示されてがskipする. プロンプトがmarimo>になれば対話ができる状態である.
とりあえずpingで生存確認.

marimo> @marimo ping
marimo> PONG

pongの返答があればok. 他にも使える対話コマンドが多くある.

marimo> marimo help

Deploy Hubot

marimoをHerokuにdeployする.

事前にHeroku Account, Heroku App, Heroku Toolbeltを用意しておく.

# heroku appを作成. アプリ名は適宜変更. 今回はmarimo-appで作成
heroku create <app name>

Hubotがデータを永続化(brain)するのに必要なredisをHeroku側に用意しておく.

# 無料planの30MBタイプを指定. addon追加にはHerokuにクレジットカード要登録
# https://elements.heroku.com/addons/rediscloud#pricing
heroku addons:create rediscloud:30

heroku createローカルGit repositoryのremoteにherokuが追加されるので, remoteへhubot scriptをpushする.

git push heroku master

rootにあるProcfileを見てみる.

web: bin/hubot -a compfire

-a引数により, hubotのadapterがcampfireになっている.
他のチャットサービスと連携させたい場合はadapterを追加してこれを編集する.

Hello Slack

HubotをSlackと連携させる. Slackと連携させるためのadapterはすでに用意されている.

slack adapterをインストールする.

npm install hubot-slack --save

# installできたか確認
npm list hubot-slack
marimo@0.0.0 /Users/yuki312/marimo
└── hubot-slack@3.4.0 

Heroku deploy時に使われるscriptも変更しておく.

vim Procfile

# 下記内容に変更
#   before: web: bin/hubot -a campfire
#   after : web: bin/hubot -a slack

slackのintegrationにHubotを追加するとHUBOT_SLACK_TOKENが得られるのでこれをHeroku環境変数に設定.

heroku config:add HEROKU_URL=https://<Heroku App URL>
heroku config:add HUBOT_SLACK_TOKEN=xoxb-...

git commitしたらHerokuへdeployして完了.

git add .
git commit -m "support slack"
git push heroku master

以上.

2015/10/11

Android: Local Firebase Server + Unit Test

Firebaseを無料Planで使うため, Unit Testで帯域を消費したくない.
Firebaseをローカルサーバで用意して, それと通信することでこれを回避する.

Robolectric(JVM)で試そうとしたが, サーバからonCompleteの応答が受け取れず, 現状Instrumentation Unit Testで試している.

Local Firebase Server

e2eのシナリオテスト用には十分なFirebase ServerがNode moduleとして提供されているのでそれを利用する.

npm install --save-dev firebase-server

firebase serverを起動するjsを用意する. ファイル名はlaunch_local_firebase.jsとでもしておく.

var FirebaseServer = require('firebase-server');
FirebaseServer.enableLogging(true);
new FirebaseServer(5000, 'test.firebase.localhost', {
  /* You can put your initial data model here, or just leave it empty */
});

Firebaseはホスト名にドットを2つ含んでいる必要があるためlocalhost:5000では接続できない.
Local Firebase serverはtest.firebase.localhostとして起動する.

Local Firebase Serverへの要求/応答をロギングするためにenableLogging(true)を指定しておくと便利.

ホストPCのhostファイルにtest.firebase.localhost127.0.0.1つまりlocalhostで接続できるように次の一行を追記する.
Macであれば/private/etc/hostsあたりにホストファイルがある.

127.0.0.1 test.firebase.localhost

あとは先ほど作成したlaunch_local_firebase.jsを起動する.

node launch_local_firebase.js 

これでLocal Firebase Serverの準備は完了.

Run AndroidTest

あとはAndroidからFirebaseへ接続するだけでよい. 接続先はローカルホストになるため,

new Firebase("ws://test.firebase.localhost:5000/");

としていする. ただしGenymotionはlocalhostに固有のIPが割り当てられているため下記とする必要がある点に注意.

new Firebase("ws://192.168.56.1:5000/");

RobolectricでFirebaseからのコールバックが発火しない問題があり渋々Instrumentation Testで実行しているが, 解決方法をご存知の方はご教授頂けると幸いです.

ちなみに, 簡易な確認でよければofflineモードでテストをパスする方法もあるが, 信用性の面で採用しなかった.

public static class DebugModule extends Module {

  public DebugModule(Context context) {
    super(context);
  }

  @Override Firebase provideFirebase() {
    Firebase.setAndroidContext(context);
    Firebase firebase = new Firebase(FirebaseConstant.DEBUG_URI);
    firebase.goOffline();
    return firebase;
    }
  }

以上.

2015/10/01

AndroidStudio1.4 - Vector drawable to PNG

API Lv.21でVector drawableがサポートされ, AndroidStudio1.4でSVGからVector drawableを生成するVector Assetsがサポートされた.

Android Developers Blog: Android Studio 1.4 - http://goo.gl/iveCRd

また, 2015/10/01現在android gradleのバージョンにcom.android.tools.build:gradle:1.4.0-beta3を指定することでAPI Lv.20以下向けの互換性機能を使用することができる.
これは, res/drawable配下にあるVector drawableから各種png形式のdrawableを生成するもので,
minSdkVersionが20以下, 他リソースから参照されているVector drawableを持つ, など互換性対応が必要と判断される場合に有効となる.

互換用drawableはビルド時に生成されるためsrc上に現れないがbuild/outputや生成されたapkを展開するとpngの出力を確認できる.

以上.

2015/06/23

MortarScopeのためのMock

Mortarを採用したプロジェクトでは各所でMortarScopeが必要になる.
MortarScopeはContext.getSystemServiceを経由して取得されるが, InstrumentationRegistry.getTargetContext()で取得できるContextにはこれが実装されていないためMockオブジェクトを用意する必要がある.

以下はMotar/PresenterをテストするためのMortar/Viewのmockクラス.
MortarScopeを生成するためオリジナルのContextをContext.getSystemServiceのMock Methodを実装したContextWrapperでラップする.

あとはお決まりのEnter/ExitScope処理を実装すればMockは完成する.

private static class Viewer implements MyPresenter.MyViewer {
  private Context context;
  private MortarScope mortarScope;
  private MyPresenter presenter;

  public Viewer(Context context, MyPresenter presenter) {
    // MortarScopeを返すラッパーを定義する. 
    this.context = new ContextWrapper(context) {
      @Override
      public Object getSystemService(String name) {
        return mortarScope != null && mortarScope.hasService(name) ?
            mortarScope.getService(name) : super.getSystemService(name);
      }
    };
    this.presenter = presenter;
  }

  public void onCreate() {
    // お決まりのスコープ定義とEnterScope処理. 
    String scopeName = "UnitTestScope";
    mortarScope = MortarScope.buildRootScope().build("Root").buildChild()
        .withService(BundleServiceRunner.SERVICE_NAME, new BundleServiceRunner())
        .withService(ObjectGraphService.SERVICE_NAME, ObjectGraph.create(new AppHomeModule()))
        .build(scopeName);
    BundleServiceRunner.getBundleServiceRunner(getContext()).onCreate(null);

    presenter.takeView(this);
  }

  public void onDestroy() {
    // お決まりのExitScope処理. 
    presenter.dropView(this);
  }

  // MyPresenter.MyViewerの抽象メソッドを実装
  @Override
  public Context getContext() {
    return context;
  }
}

Mortar/Viewの生成と破棄はsetup/tearDownで実装した.

@Before
public void setup() throws Exception {
  presenter = new MyPresenter();
  viewer = new Viewer(InstrumentationRegistry.getTargetContext(), presenter);
  viewer.onCreate();
}

@After
public void tearDown() {
  viewer.onDestroy();
}

以上.

2015/06/14

RecyclerViewでRealmResultを扱う

Realmはクエリ結果となるRealmResultをListViewで表示するためのアダプタとしてRealmBaseAdapterを用意している.
ListViewを使用する場合は問題ないがRecyclerViewではこれを使用できない.

RealmResultをRecyclerViewで使用するためのアダプタのベースを書いた.
RealmRecyclerViewAdapter.java

import android.content.Context;
import android.support.v7.widget.RecyclerView;

import io.realm.RealmObject;
import io.realm.RealmResults;

public abstract class RealmRecyclerViewAdapter<T extends RealmObject, VH extends RecyclerView.ViewHolder>
    extends RecyclerView.Adapter<VH> {

  protected RealmResults<T> realmResults;
  protected Context context;

  public RealmRecyclerViewAdapter(Context context, RealmResults<T> realmResults) {
    if (context == null) {
      throw new IllegalArgumentException("Context cannot be null");
    }
    if (realmResults == null) {
      throw new IllegalArgumentException("RealmResults cannot be null");
    }

    this.realmResults = realmResults;
    this.context = context;
  }

  @Override
  public int getItemCount() {
    return realmResults.size();
  }
}

RecyclerView.Adapterを実装する際は上記アダプタを継承し, オリジナルのアダプタを作成する.

import android.content.Context;
import android.support.v7.widget.RecyclerView;
import android.view.LayoutInflater;
import android.view.View;
import android.view.ViewGroup;
import android.widget.TextView;

import io.realm.RealmResults;

public class ModuleAdapter extends RealmRecyclerViewAdapter<Module, ModuleAdapter.ViewHolder> {

  static class ViewHolder extends RecyclerView.ViewHolder {
    private TextView value, id;

    public ViewHolder(View v) {
      super(v);
      value = (TextView) v.findViewById(android.R.id.text1);
      id = (TextView) v.findViewById(android.R.id.text2);
    }
  }

  public ModuleAdapter(Context context, RealmResults<Module> realmResults) {
    super(context, realmResults);
  }

  @Override
  public ViewHolder onCreateViewHolder(ViewGroup parent, int viewType) {
    View v = LayoutInflater.from(context)
        .inflate(android.R.layout.simple_list_item_2, parent, false);
    return new ViewHolder(v);
  }

  @Override
  public void onBindViewHolder(ViewHolder view, int position) {
    Module module = realmResults.get(position);
    view.id.setText(module.getId());
    view.value.setText("value:" + module.getValue());
  }
}

以上.

2015/06/07

Android: Jacoco

apply plugin: 'jacoco'

android {
  jacoco {
    version = '0.7.5.201505241946'
  }

task jacocoTestReport(type: JacocoReport, dependsOn: "connectedCheck") {
  group = "Reporting"
  description = "Generate Jacoco coverage reports"

  reports {
      xml.enabled = false
      html.enabled = true
      html {
          destination "./build/reports/jacoco/${project.name}"
      }
  }

  classDirectories = fileTree(
      dir: './build/intermediates/classes/development/debug',
      excludes: ['**/R.class',
        '**/R$*.class',
        '**/BuildConfig.*',
        '**/Manifest*.*',

        // ButterKnife Gen.
        '**/*$$ViewBinder.*'
      ]
  )

  sourceDirectories = files('src/main/java')
  executionData = files('./build/jacoco/testDevelopmentDebugUnitTest.exec')
}

実行する場合はjacocoTestReportを実行する.

$ ./gradlew :app:jacocoTestReport

excludesの指定について, ButterKnifeライブラリを使用している場合は自動生成されるViewBingerクラスを除外する必要がある.
Jacocoは$記号が連続するクラス名を持つ場合にうまく動作しない. ButterKnifeは$$を含むクラスを生成するため, これを除外しておく必要がある.

参考: Issue 69174: Gradle Build System Jacoco VerifyException when used with Dagger

2015/06/04

Smart Lock for Passwords on Android

端末間でパスワードを同期する

Google Smart Lock for Passwords を使うと、お気に入りのアプリやウェブサイトで使用するアカウントのセキュリティを簡単に強化できます。ユーザーは、Smart Lock で Google アカウントに保存されたパスワードを、Chrome で表示したウェブサイトや Android 搭載端末のアプリで簡単かつ安全に利用できます。

Smart Lock for Passwords を使用すると、Chrome で保存したパスワードを Android 搭載端末で利用できる場合があります。同様に、Android 搭載端末で保存したパスワードを、Google アカウントでログイン済みの Chrome ブラウザで利用できる場合があります。各パスワードは対応するアプリやサイトでのみ利用可能です。詳しくは、ウェブサイトのパスワードを管理するをご覧ください。

携帯端末でパスワードを保存する

Smart Lock for Passwords がオンの場合は、端末のアプリにログインすると、ログイン情報を保存するかどうかの確認を求められる場合があります。[パスワードを保存] をタップすると、アプリ用のパスワードを安全に保存できます。2 つ以上の Google アカウントで端末にログインしている場合は、パスワードを保存するアカウントを選択できます。

Google アカウントに保存されたパスワードで対応アプリに初めてログインすると、Smart Lock for Passwords を使用していることが通知されます。保存したパスワードは passwords.google.com でいつでも確認できます。

引用元: https://support.google.com/accounts/answer/6197437

保存したパスワードを管理する

Chrome ではさまざまなサイトのパスワードを保存できます。Chrome でウェブサイトにログインすると毎回、そのサイトのパスワードを保存するかどうかを確認するメッセージが表示されます。

Chrome にログインしている場合、パスワードは Google アカウントにも同期されます。そのため、同期されたパスワードを別のデバイスでも使用できます。

Chrome でのパスワードの扱い

Chrome でのパスワードの扱いは、デバイス間でパスワードを同期するかどうかによって異なります。

Chrome にログインしているか、Android で Google Smart Lock for Passwords を使っている場合は、Chrome で保存したパスワードを使って Android 搭載端末で自動ログインできる可能性があります。

同様に、Android 搭載端末で保存したパスワードは、Google アカウントでログインした場合に Chrome でも使用できます。

詳しくは、Chrome と Android 搭載端末の間でのパスワードの同期についての説明をご覧ください。

注: Chrome にログインしている場合、ログインに使用した Google アカウントのパスワードを保存するかどうかを確認するメッセージは表示されません。

引用元: https://support.google.com/chrome/answer/95606

Chrome上でWebサービスがID-パスワード形式でユーザ認証する場合, そこで入力したパスワードを保存するかどうか, Chromeが問合せてくる場合がある. パスワードを保存することで同サービスへログインする場合に再度パスワードを入力する必要がなくなるため, サインインの手間を省くことができる.

Chromeのこの便利な機能をAndroidアプリケーション上でも実現することができる.
Smart Lock for Password機構によりアカウントのパスワード情報はGoogleによって安全に管理される.
AndroidアプリケーションはGoogleApiClientを通すことでSmart Lock for Passwordの恩恵を受けることができる.

Smart Lock for Passwords on Android

http://get.google.com/smartlock/

https://developers.google.com/identity/smartlock-passwords/android/

Programmatically save and retrieve credentials, and automatically sign users in across devices and websites in Chrome.

By integrating Smart Lock for Passwords into your Android app, you can automatically sign users in to your app using the credentials they have saved. Users can save both username-password credentials and federated identity provider credentials.

プログラマブルにクレデンシャルを保存および取得し, 異なるデバイス間でのサインインやクロームで訪れるWebサイトの認可処理を自動化する.

Smart Lock for Passwordをあなたのアプリケーションへ統合することで, Smart Lock for Passwordに保存されているクレデンシャルを使用して認可処理を自動化できる. ユーザはユーザ名-パスワードのクレデンシャルと連携IDプロバイダのクレデンシャルを保存することができる.

Integrate Smart Lock for Passwords into your app by using the Credential API to retrieve saved credentials on sign-in. Use successfully retrieved credentials to sign the user in, or use the Credential API to rapidly on-board new users by partially completing your app’s sign in or sign up form. Prompt users after sign-in or sign-up to store their credentials for future automatic authentication.

Smart Lock for Passwordでは保存されたクレデンシャルを取得するためにCredential APIを使う. ユーザのサインインにクレデンシャルを使用するか, Credential APIを使って新しいユーザのサインイン/サインアップを素早く済ませるために一部の情報を埋めた状態でサインイン/サインアップ用の入力フォームを表示する. 自動認可処理のためにユーザがサインイン/サインアップを終えたらクレデンシャルを保存する.

Add Smart Lock for Passwords to Your Android App

Store user credentials with Auth.CredentialsApi.save():

Auth.CredentialApi.save()を使用してクレデンシャルの保存を行う.

Auth.CredentialsApi.save(mCredentialsClient, credential).setResultCallback(
  new ResultCallback() {
      @Override
      public void onResult(Status status) {
          if (status.isSuccess()) {
              // Credentials were saved
          } else {
              if (status.hasResolution()) {
                  // Try to resolve the save request. This will prompt the user if
                  // the credential is new.
                  try {
                      status.startResolutionForResult(this, RC_SAVE);
                  } catch (IntentSender.SendIntentException e) {
                      // Could not resolve the request
                  }
              }
          }
      }
  });

Retrieve stored credentials with Auth.CredentialsApi.request() :

Auth.CredentialsApi.request()で保存されたクレデンシャルを取得する.

Auth.CredentialsApi.request(mCredentialsClient, mCredentialRequest).setResultCallback(
  new ResultCallback() {
      @Override
      public void onResult(CredentialRequestResult credentialRequestResult) {
          if (credentialRequestResult.getStatus().isSuccess()) {
              // Handle successful credential requests
          } else {
              // Handle unsuccessful and incomplete credential requests
          }
      }
  });

Start integrating Smart Lock for Passwords into your Android app

https://developers.google.com/identity/smartlock-passwords/android/get-started

Before you start integrating Smart Lock for Passwords into your app, configure your Google Developers Console project (or create a new project), then enable the Play Services SDK in your Android Studio project. Next steps describes how to integrate Smart Lock for Passwords into your app.

Smart Lock Passwordを導入する前にGoogle Developers Consoleプロジェクトをセットアップし, Android StudioでPlay Service SDKの準備をしておく.

Prerequisites

Smart Lock Password on Androidの必須要件.

  • Android 2.3 or higher かつ Google Play Store 搭載
  • Android emulator with AVD の場合はGoogle APIs platformが搭載された Android 4.2.2 or higher
  • Android Studio(recommended)

Configure your Google Developers Console project

To use Google services, you must create a Google Developers Console project, create an OAuth 2.0 client ID, and register your digitally signed .apk file’s public certificate:

Googleサービスを使用するにはGoogle Developers Console Projectを作成する必要がある. OAuth2.0のクライアントIDを作成し, 電子署名された.apkファイルの公開証明書を登録する.

〜Google Developers Console Projectの説明は省略〜

Configure your Android Studio project

Google Play Serviceを導入. build.gradleのdependenciesを編集する.

compile 'com.google.android.gms:play-services:7.5.0'

AndroidManifest.xmlにGoogle Play Serviceのバージョンを定義.

    <meta-data
        android:name="com.google.android.gms.version"
        android:value="@integer/google_play_services_version"/>

Create a GoogleApiClient object

To request stored credentials, you must create an instance of GoogleApiClient configured to access the Credentials API.

保存されたクレデンシャルを得るためにGoogleApiClientをからCredentials APIにアクセスする.

mCredentialsClient = new GoogleApiClient.Builder(this)
    .addConnectionCallbacks(this)
    .addOnConnectionFailedListener(this)
    .addApi(Auth.CREDENTIALS_API)
    .build();

Create a CredentialRequest object

A CredentialRequest object specifies the sign-in systems from which you want to request credentials. Build a CredentialRequest using the setSupportsPasswordLogin() method for password-based sign-in, and the setAccountTypes() method for federated sign-in services such as Google Sign-In.

CredentialRequestオブジェクトはサインインシステムに求めるクレデンシャルのリクエストである. CredentialRequestの構築にはパスワードベースサインインのためのsetSupportsPasswordLogin()と, Google Sing-inのような連携サインインサービスのためのsetAccountTypes()がある.

mCredentialRequest = new CredentialRequest.Builder()
    .setSupportsPasswordLogin(true)
    .setAccountTypes(IdentityProviders.GOOGLE, IdentityProviders.TWITTER)
    .build();

Use the constants defined in IdentityProviders to specify commonly-used sign-in providers. For other sign-in providers, use any string that uniquely identifies the provider. You must use the same provider identifier to store credentials as you use to retrieve the credentials.

IdentityProvidersにある定数を使用すると一般的なサインインプロバイダーを指定できる. 他のサインインプロバイダーはプロバイダーを識別できる他のユニークな文字列IDを使用すること. 保存した時のクレデンシャルと読み込む際のクレデンシャルで使用するプロバイダIDは同じであること.

Request stored credentials

After you have created GoogleApiClient and CredentialRequest objects, pass them to the CredentialsApi.request() method to request credentials stored for your app.

GoogleApiClientCredentialRequestオブジェクトを作成したあとはCredentialsApi.request()メソッドにそれらを渡してアプリに保存されたクレデンシャルをリクエストする.

Auth.CredentialsApi.request(mCredentialsClient, mCredentialRequest).setResultCallback(
    new ResultCallback<CredentialRequestResult>() {
        @Override
        public void onResult(CredentialRequestResult credentialRequestResult) {
            if (credentialRequestResult.getStatus().isSuccess()) {
                // See "Handle successful credential requests"
                onCredentialRetrieved(credentialRequestResult.getCredential());
            } else {
                // See "Handle unsuccessful and incomplete credential requests"
                resolveResult(credentialRequestResult.getStatus(), RC_READ);
            }
        }
    });

Define a callback to handle successful and failed requests using the setResultCallback() method.

コールバックを作成してリクエストの成功と失敗をハンドリングするにはsetResultCallback()メソッドを使用する.

Handle successful credential requests

On a successful credential request, use the resulting Credential object to complete the user’s sign-in to your app. Use the getAccountType() method to determine the type of retrieved credentials, then complete the appropriate sign-in process. For example, for Google Sign-In, create a GoogleApiClient object that includes the user’s ID, then use the object to start the sign-in flow. For password-based sign-in, use the user’s ID and password from the Credential object to complete your app’s sign-in process.

クレデンシャルのリクエストがうまくいくと, サインインの結果としてCredentialオブジェクトを返す. サインインを終えたらgetAccountType()メソッドを使いクレデンシャルの種別を取得する. 例えば, Google Sign-inではユーザIDを含んだGoogleApiClientオブジェクトを作成し, サインインフローを開始する. パスワードベースのサインインではCredentialオブジェクトからユーザIDとパスワードを使用してサインインプロセスを完了させる.

private void onCredentialRetrieved(Credential credential) {
    String accountType = credential.getAccountType();
    if (accountType.equals(IdentityProviders.GOOGLE)) {
        // The user has previously signed in with Google Sign-In. Start the sign-in flow with
        // the same ID.
        // See https://developers.google.com/identity/sign-in/android/
    } else if (accountType == null)
        // Sign the user in with information from the Credential.
        signInWithPassword(credential.getId(), credential.getPassword());
    }
}

Handle unsuccessful and incomplete credential requests

Credential requests can fail when:

  • Multiple credentials are saved
  • No credentials are saved
  • User input is required to proceed
  • There is a network or server error

クレデンシャルリクエストは次のケースで失敗する

  • 複数のクレデンシャルが保存されている
  • クレデンシャルが保存されていない
  • 続けてのユーザ入力が必要
  • ネットワークかサーバのエラー

When multiple credentials are saved or user input is required, the hasResolution() method returns true. In this case, call the status object’s startResolutionForResult() method to prompt the user to choose an account. Then, retrieve the user’s chosen credentials from the activity’s onActivityResult() method by passing Credential.EXTRA_KEY to the getParcelableExtra() method.

複数のクレデンシャルが保存されているか, ユーザの入力が必要である場合, hasResulution()メソッドはtrueを返す. このケースではstartResolutionForResult()メソッドを呼びユーザにアカウントの選択を促す ユーザが選択したクレデンシャルはActivityのonActivityResult()メソッドに渡されるIntentgetParcelableExtra()Credential.EXTRA_KEYを指定することで取得できる.

private void resolveResult(Status status, int requestCode) {
    if (status.hasResolution()) {
        try {
            status.startResolutionForResult(this, requestCode);
        } catch (IntentSender.SendIntentException e) {
            Log.e(TAG, "STATUS: Failed to send resolution.", e);
        }
    } else {
        // The user must create an account or sign in manually.
        Log.e(TAG, "STATUS: Unsuccessful credential request had no resolution.");
    }
}
@Override
public void onActivityResult(int requestCode, int resultCode, Intent data) {
    super.onActivityResult(requestCode, resultCode, data);

    ...

    if (requestCode == RC_READ) {
        if (resultCode == RESULT_OK) {
            Credential credential = data.getParcelableExtra(Credential.EXTRA_KEY);
            onCredentialRetrieved(credential);
        } else {
            Log.e(TAG, "Credential Read: NOT OK");
            Toast.makeText(this, "Credential Read Failed", Toast.LENGTH_SHORT).show();
        }
    }

    ...

}

When stored credentials are not found, users must create an account or manually sign in. You can expedite the sign-up and sign-in processes by automatically filling some fields of the forms with information from recently-used accounts. See Provide sign-in hints to a user for information on how to prompt the user to select a recently-used account.

保存されているクレデンシャルが見つからない時, ユーザはアカウントを作成して手動でサインインする必要がある. この時, 最近使用したアカウントから情報を得て入力フォームを埋めることでユーザのサインイン/サインアップを手助けできる. Provide sign-in hints to a user ではどのようにしてユーザに最近使用したユーザを選択させるかの方法が載ってある.

On successful sign in, allow users to save their credentials to automate future authentication on all their devices.

サインインが成功すると, 全てのデバイスで今後サインインを自動化するためにユーザはクレデンシャルを保存することができる.

Provide sign-in hints to a user

Requests to retrieve user credentials can fail when a user has not yet saved credentials or when a user has not yet signed up to your app. In these situations, use the Credentials API to retrieve sign-in hints, such as the user’s name and email address. Use these hints to pre-fill your app’s sign-in and sign-up forms, speeding up your app’s on-boarding process.

ユーザがまだクレデンシャルを保存していない場合やまだアプリケーション上でサインアップしていない場合はクレデンシャルの取得に失敗する可能性がある. この場合, Credentials APIを使用してサインインのヒント(ユーザ名やeメールアドレス etc)を得ることができる. ユーザのサインアップ時にはこれらのヒントを使用してあらかじめサインアップのためのフォームに情報を埋めておき素早くサインアップできるように配慮する.

Retrieve sign-in hints and pre-fill the sign-up form

Sign-in hints are available under the following conditions:

  • CredentialRequestResult.getStatus().isSuccess() is false
  • CredentialRequestResult.getStatus().hasResolution() is true
  • CredentialRequestResult.getStatus().getStatusCode() returns SIGN_IN_REQUIRED

To retrieve the sign-in hints, pass a request code to Status.startResolutionForResult() to indicate that sign-in hints are available:

サインインのヒントは次の条件で使用できる.

  • CredentialRequestResult.getStatus().isSuccess() is false
  • CredentialRequestResult.getStatus().hasResolution() is true
  • CredentialRequestResult.getStatus().getStatusCode() returns SIGN_IN_REQUIRED

サインインのヒントを取得し, これが有効であることを示すためにStatus.startResolutionForResult()へリクエストコードを渡す.

static final int RC_READ = 1;
static final int RC_GET_HINTS = 2;

...

private void resolveResult(Status status) {
    int requestCode;
    if (status.hasResolution()) {
        if (status.getStatusCode() == CommonStatusCodes.SIGN_IN_REQUIRED) {
            requestCode = RC_GET_HINTS;
        } else {
            requestCode = RC_READ;
        }
        try {
            status.startResolutionForResult(MainActivity.this, requestCode);
        } catch (IntentSender.SendIntentException e) {
            Log.e(TAG, "STATUS: Failed to send resolution.", e);
        }
    } else {
        // The user must create an account or sign in manually.
        Log.e(TAG, "STATUS: Unsuccessful credential request had no resolution.");
    }
}

The user is prompted to choose an account to use.

Then, in the activity’s onActivityResult() method, retrieve the hints from the Credential.EXTRA_KEY parcel, check whether the user is in your user database, and start the appropriate activity with the credentials hint.

プロンプトを表示してアカウントを選択するようにユーザへ求める.

ActivityのonActivityResult()メソッドでparcelからCredential.EXTRA_KEYを使ってヒントを取得し, ユーザがあなたのデータベースに存在するかどうか確認し, クレデンシャルヒントを付帯させて適切なActivityを起動する.

@Override
public void onActivityResult(int requestCode, int resultCode, Intent data) {
    super.onActivityResult(requestCode, resultCode, data);

    if (requestCode == RC_GET_HINTS) {
        if (resultCode == RESULT_OK) {
            Credential credential = data.getParcelableExtra(Credential.EXTRA_KEY);
            Intent intent;
            // Check for the user ID in your user database.
            if (userDatabaseContains(credential.getId())) {
                intent = new Intent(this, SignInActivity.class);
            } else {
                intent = new Intent(this, SignUpNewUserActivity.class);
            }
            intent.putExtra("com.mycompany.myapp.SIGNIN_HINTS", credential);
            startActivity(intent);
        } else {
            Log.e(TAG, "Hint Read: NOT OK");
            Toast.makeText(this, "Hint Read Failed", Toast.LENGTH_SHORT).show();
        }
    }

    ...

}

In the sign-in and sign-up activities, pre-fill the sign-up fields with the sign-in hints that you added to the intent.

サインイン/サインアップのActivityでサインアップ用のフィールドをIntentから得たサインインヒントで予め埋める.

public class SignUpNewUserActivity extends Activity {

    @Override
    protected void onCreate(Bundle savedInstanceState) {
        super.onCreate(savedInstanceState);

        Intent intent = getIntent();
        Credential credential = intent.getParcelableExtra("com.mycompany.myapp.SIGNIN_HINTS");

        // Pre-fill sign-up fields
        mUsernameView.setText(credential.getId());
        mDisplaynameView.setText(credential.getName()); // Might be null.

        ...
    }

    ...
}

Store a user’s credentials

After users successfully sign in, create accounts, or change passwords, allow them to store their credentials to automate future authentication in your app.

ユーザのサインインが成功し, アカウントを作成またはパスワードを変更した後, 自動認証のためのクレデンシャルをアプリケーションに保存する.

Store credentials

Create a Credential object containing a user’s sign-in information. For example, to let users store their credentials after successfully signing in with their passwords:

ユーザサインイン情報を含んだCredentialオブジェクトを作成する. 例えばパスワードでログインした後にクレデンシャルを保存する場合は:

Credential credential = new Credential.Builder(email)
        .setPassword(password)
        .build();

Or, for example, after users successfully sign in with their Google accounts:

または, サインインが成功した後にGoogleアカウントを保存する場合.

Credential credential = new Credential.Builder(email)
        .setAccountType(IdentityProviders.GOOGLE)
        .build();

Then, call CredentialsApi.save() to save users’ credentials. If the call to CredentialsApi.save() is not immediately successful, the credentials might be new, in which case the user must confirm the save request. Resolve the save request with startResolutionForResult() to prompt the user for confirmation.

次いで, CredentialsApi.save()を呼び出しクレデンシャルを保存する. CredentialsApi.save()の呼び出しですぐに成功しない場合, 保存しようとしているクレデンシャルが新規作成物であり, ユーザにクレデンシャルの保存の同意を必要としている場合がある.
保存のリクエストを解決するにはstartResolutionForResult()でユーザ確認のプロンプトを表示する.

Auth.CredentialsApi.save(mCredentialsClient, credential).setResultCallback(
            new ResultCallback() {
                @Override
                public void onResult(Status status) {
                    if (status.isSuccess()) {
                        Log.d(TAG, "SAVE: OK");
                        Toast.makeText(this, "Credentials saved", Toast.LENGTH_SHORT).show();
                    } else {
                        if (status.hasResolution()) {
                            // Try to resolve the save request. This will prompt the user if
                            // the credential is new.
                            try {
                                status.startResolutionForResult(this, RC_SAVE);
                            } catch (IntentSender.SendIntentException e) {
                                // Could not resolve the request
                                Log.e(TAG, "STATUS: Failed to send resolution.", e);
                                Toast.makeText(this, "Save failed", Toast.LENGTH_SHORT).show();
                            }
                        } else {
                            // Request has no resolution
                            Toast.makeText(this, "Save failed", Toast.LENGTH_SHORT).show();
                        }
                    }
                }
            });
@Override
public void onActivityResult(int requestCode, int resultCode, Intent data) {
    super.onActivityResult(requestCode, resultCode, data);

    ...

    if (requestCode == RC_SAVE) {
        if (resultCode == RESULT_OK) {
            Log.d(TAG, "SAVE: OK");
            Toast.makeText(this, "Credentials saved", Toast.LENGTH_SHORT).show();
        } else {
            Log.e(TAG, "SAVE: Canceled by user", e);
        }
    }

    ...

}

After storing credentials, retrieve them by calling CredentialsApi.request().

クレデンシャルを保存した後, CredentialsApi.request()でそれを取得する.

Enable automatic sign-in across apps and websites

If you have an app and a website that share a user database or use federated sign-in providers such as Google Sign-In, you can associate the app with the website so that users save their credentials once and then automatically sign in to both the app and the website.

アプリとWebサイトを持ち, ユーザデータベースかGoogle Sign-Inのような連携サインインの仕組みを提供する場合, Webサイトとアプリを関連付けてユーザの保存したクレデンシャルをアプリでも使用して自動サインインに利用できる.

To associate an app with a website, first verify that you own the website by using the Google Search Console, then use the Play Developer Console to make the association.

Webサイトとアプリを関連付けるため, 自前WebサイトをGoogle Search Consoleで有効化し, Play Developer Consoleを使ってアプリとWebサイトを関連付ける.

Prerequisites

Your website must be available through HTTPS.

あなたのWebサイトでHTTPSが使える必要がある.

Verify ownership of your website

If you have not already verified ownership of your website with the Google Search Console, do so by following these steps:

まだ有効化されたWebサイトを持っていないのであれば, 次のステップを踏む.

〜Google Search / Play Developer Consoleの操作については省略〜
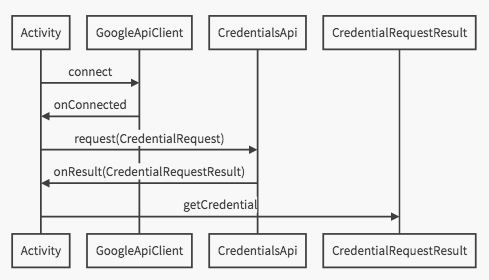
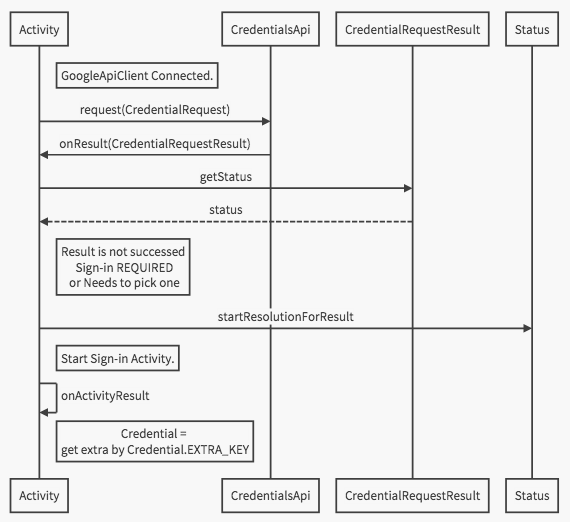

Sequence

クレデンシャルが保存済みである場合の正常ケース:

Credential saved

サインインが必要, あるいはアカウントの選択が必要である場合の正常ケース:

Need Signin

ソースコードについてはサンプルコードが公開されている.

以上.

2015/06/02

Firebase - セキュリティとFirebase Rules

Firebase公式サイトにあるSecurity&Rulesの翻訳です.
https://www.firebase.com/docs/security/

Security & Rules Quickstart

Firebase provides a flexible, expression-based rules language with JavaScript-like syntax to easily define how your data should be structured and when your data can be read from and written to.
Combined with our login service which allows for easy authentication, you can define who has access to what data and keep all of your user’s personal information secure.
The Security and Firebase Rules live on the Firebase servers and are automatically enforced at all times.

FirebaseはJavaScriptライクな構文でルールを記述できる仕組みを用意しており, データへのRead/Write制御を柔軟で手軽に構築できる.
Firebaseが備えている手軽なログインサービスと組み合わせて, データへのアクセス制御とパーソナルデータをセキュアに保つ.
セキュリティとFirebase RuleはFirebaseサーバ上で動作し, 常に自動でこれらが有効になっている.

Understand the Default Security and Firebase Rules

Security and Firebase Rules are used to determine who has read and write access to your Firebase database as well to ensure the structure of that data. They are found in the Security tab of your Firebase Dashboard. They come in three flavors: .write, .read, and .validate. Here is a quick summary of their purpose:

セキュリティとFirebase Ruleは誰がFirebaseのデータにRead/Writeアクセスできるのかを決定し, またデータ構造を保証する. これらはFirebaseのDashboardにあるSecurityタブから確認できる. これらの情報は.wirte, .read, .validateの3つのキーワードから成る. 下記はそれらキーワード毎の概要である.

Rule Type Description
.read Describes if and when data is allowed to be read by users.
.write Describes if and when data is allowed to be written.
.validate Defines what a correctly formatted value will look like, whether it has child attributes, and the data type.
Rule Type Description
.read ユーザによるデータREADの許容内容を記載する.
.write ユーザによるデータWRITEの許容内容を記載する.
.validate 子要素データの形式やデータタイプのバリデーション記述.

Security and Firebse Rules have a JavaScript-like syntax which makes them easy to work with. By default, your Firebase app has rules which grants every request full read and write permissions to your Firebase:

セキュリティとFirebase RuleはJavaScriptライクなシンタックスで表現される.
デフォルトルールだと, あなたのFirebaseは全ユーザにRead/Writeのフルアクセスを許可している.

{
  "rules": {
    ".read": true,
    ".write": true
  }
}

Security and Firebase Rules live on the Firebase servers and are enforced at all times. Every read and write request will only be completed if your rules allow it. With the default rules above, all requests will be permitted.

セキュリティとFirebase RuleはFirebaseサーバ上で動作し, 常に自動でこれらが有効になっている.
全てのRead/Writeリクエストはあなたの記述したルールで許容されたもののみが実行可能となる. デフォルトルールは前述の通りですべてのリクエストを受け入れる.

SECURITY BEHIND THE SCENES
Firebase handles many other security details for you.
Specifically, we use strong 2048 bit keys for our SSL certificates, sign authentication tokens with SHA256 HMAC signatures, and use BCrypt for password storage.

セキュリティの舞台裏
Firebaseは他にも多数のセキュリティ機能を備えている.
具体的にはSSL証明書には2048bit長鍵を使用しており, 認証トークン署名にはSHA256 HMACシグネチャを用いている. さらにパスワードストレージにはBCryptを使用している.

Use Predefined Variables

There are a number of helpful, predefined variables that can be accessed inside a security rule definition. Here is a brief summary of each:

セキュリティルールを定義する際には予め用意された役に立つ変数を使用することができる.

Variable Description
now The current time in milliseconds since Linux epoch. This works particularly well for validating timestamps created with the SDK’s Firebase.ServerValue.TIMESTAMP.
root A RuleDataSnapshot representing the root path in the Firebase database as it exists before the attempted operation.
newData A RuleDataSnapshot representing the data as it would exist after the attempted operation. It includes the new data being written and existing data.
data A RuleDataSnapshot representing the data as it existed before the attempted operation.
$variables A wildcard path used to represent ids and dynamic child keys. auth Represents an authenticated user’s token payload.
Variable Description
now UNIX標準時ベースの現在時刻(msec). この変数はFirebase.ServerValue.TIMESTAMPのタイムスタンプを検証するのに適している.
root Firebaseデータベースのルートパスを表すRuleDataSnapshot. オペレーションの前に存在するデータを指す.
newData Firebaseデータベースの新しいデータを表すRuleDataSnapshot. オペレーションの後に存在するであろうデータを指す.
data Firebaseデータベースの既存データを表すRuleDataSnapshot. オペレーションの前に存在するデータを指す.
$ variables ID, 子要素のKeyを指すワイルドカードパス
auth 認証済みユーザトークンのペイロード

These variables can be used anywhere in your Security and Firebase Rules. For example, the security rules below ensure that data written to the /foo/ node must be a string less than 100 characters:

これらの変数はセキュリティとFirebase Ruleの各所で使用することができる. 例えば, 下記のセキュリティルールは/foo/ ノードへの書き込みにあたり100文字未満であることをバリデートする.

{
  "rules": {
    "foo": {
      // /foo is readable by the world
      ".read": true,
      // /foo is writable by the world
      ".write": true,
      // data written to /foo must be a string less than 100 characters
      ".validate": "newData.isString() && newData.val().length < 100"
    }
  }
}

Make Your Rules Dynamic

Your Security and Firebase Rules should follow the structure of the data you have stored in your Firebase database. For example, say you are keeping track of a list of messages and that your data looks like this:

セキュリティとFirebase Ruleはあなたが持つFirebase databaseのデータ構造に従ったものとする必要がある.
例えば, メッセージリストをトラッキングするデータ構造は下記のようになる

{
  "messages": {
    "message0": {
      "content": "Hello",
      "timestamp": 1405704370369
    },
    "message1": {
      "content": "Goodbye",
      "date": 1405704395231
    },
    ...
  }
}

Your rules should be structured in a similar manner. We can make use of $ variables in rules which represent dynamic child keys. In addition, we can use .validate rules to ensure our data is properly structured. For example, the $message variable below represents each of the /messages/ node’s children:

これのルールについても同じ構成である必要がある. ルールの中では$変数を使用して直接の子Keyを表現することができる. また正しい構成であるかの確認に.validateルールも使用できる.
例えば, $message変数は下記の/messages/ノード配下の子要素を表現する.

{
  "rules": {
    "messages": {
      "$message": {
        // only messages from the last ten minutes can be read
        ".read": "data.child('timestamp').val() > (now - 600000)",
        // new messages must have a string content and a number timestamp
        ".validate": "newData.hasChildren(['content', 'timestamp']) && newData.child('content').isString() && newData.child('timestamp').isNumber()"
      }
    }
  }
}

Integrate Authentication Rules

Firebase gives you full control over user authentication. Login providers are server-side components that authenticate your users. Choose a built-in login provider for a common authentication use case, or build your own custom login provider to address special login needs.

Firebaseはユーザ認証の古コントロール機能を提供する. サーバサイドコンポーネントとしてユーザ認証を行うログインプロバイダーを提供する. 共通の認証にビルトインのログインプロバイダーを選択するか, 特別なログインの必要性を満たすためにカスタムされたログインプロバイダーを選択できる.

No matter how you authenticate your user, this action defines the auth variable in your Security and Firebase rules. This variable contains the user’s auth payload, which includes that user’s unique identifier (uid), and the name of the provider they logged with. Built-in providers also add provider-specific fields to auth, such as the user’s name. If you implement a custom login provider, you can add your own fields to your user’s auth payload.

あなたが選択した認証方法に関わらず, アクションはセキュリティとFirebase Ruleの中でauth変数として定義される. この変数はユーザ認証のペイロードを含み, ユーザを一意に識別(uid)し, プロバイダーの名前が記録される. ビルトインプロバイダーはユーザの名前などプロバイダー固有の領域をauthへ追加する.

Typically, you’ll store all of your users in a single users node whose children are the uid values for every user. If you wanted to restrict access to this data such that only the logged-in user can see their own data, your rules would look something like this:

一般的に, 全てのユーザを単一のusersノードにまとめ, 各ユーザはuidの値として保持する. もしログインしたユーザにのみデータへのアクセスを制限したい場合は次のようなルールになる.

{
  "rules": {
    "users": {
      "$uid": {
        ".read": "auth != null && auth.uid == $uid"
      }
    }
  }
}
2015/06/01

RecyclerView ItemTouchHelper

はじめに

ItemTouchHelper - Android Developers

Android support libraryのRecyclerViewにItemTouchHelperが追加された. support library v22.2.0を導入することで使用できる.

compile 'com.android.support:recyclerview-v7:22.2.0'

ItemTouchHelperを使用すればアイテム項目のスワイプやドラッグ&ドロップ操作を簡単に導入できる.

    RecyclerView recyclerView = (RecyclerView) findViewById(R.id.recyclerview);
    recyclerView.setHasFixedSize(false);
    recyclerView.setLayoutManager(new LinearLayoutManager(this));
    adapter = new RecyclerViewAdapter();
    recyclerView.setAdapter(adapter);
    ItemTouchHelper itemDecor = new ItemTouchHelper(
        new SimpleCallback(ItemTouchHelper.UP | ItemTouchHelper.DOWN,
            ItemTouchHelper.RIGHT) {
          @Override
          public boolean onMove(RecyclerView recyclerView, ViewHolder viewHolder, ViewHolder target) {
            final int fromPos = viewHolder.getAdapterPosition();
            final int toPos = target.getAdapterPosition();
            adapter.notifyItemMoved(fromPos, toPos);
            return true;
          }

          @Override
          public void onSwiped(ViewHolder viewHolder, int direction) {
            final int fromPos = viewHolder.getAdapterPosition();
            datasource.remove(fromPos);
            adapter.notifyItemRemoved(fromPos);
          }
        });
    itemDecor.attachToRecyclerView(recyclerView);

ソースコードはGitHubに公開している.

関連するクラスとメソッドを下記する.

ItemDecoration

android.support.v7.widget.RecyclerView.ItemDecoration

Class Overview

An ItemDecoration allows the application to add a special drawing and layout offset to specific
item views from the adapter’s data set. This can be useful for drawing dividers between items,
highlights, visual grouping boundaries and more.

ItemDecorationはRecyclerViewのAdapterが持つデータセットに対する特殊な描画やレイアウトといった装飾効果を与えるものである. リストアイテムの区切り線やハイライト, グルーピング表示といったことによく使用される.

All ItemDecorations are drawn in the order they were added, before the item views (in onDraw() and
after the items (in onDrawOver(Canvas, RecyclerView, RecyclerView.State)).

アイテム項目の装飾は項目を描画する前に(onDraw(Canvas, RecyclerView, RecyclerView.State))が呼ばれ, 項目が追加された後に(onDrawOver(Canvas, RecyclerView, RecyclerView.State))が呼ばれる.

Method

public void onDraw (Canvas c, RecyclerView parent, RecyclerView.State state)

Draw any appropriate decorations into the Canvas supplied to the RecyclerView. Any content drawn by this method will be drawn before the item views are drawn, and will thus appear underneath the views.

RecyclerViewのCanvasに装飾を行う. このメソッドはアイテム項目が描画される前に呼ばれる. そのため, アイテムビュよりも背面へ描画されることになる.

public void onDrawOver (Canvas c, RecyclerView parent, RecyclerView.State state)

Draw any appropriate decorations into the Canvas supplied to the RecyclerView. Any content drawn by this method will be drawn after the item views are drawn and will thus appear over the views.

RecyclerViewのCanvasに装飾を行う. このメソッドはアイテム項目が描画された後に呼ばれる. そのため, アイテムビュよりも前面へ描画されることになる.


ItemTouchHelper

android.support.v7.widget.helper.ItemTouchHelper
extends RecyclerView.ItemDecoration
implements RecyclerView.OnChildAttachStateChangeListener

Class Overview

This is a utility class to add swipe to dismiss and drag & drop support to RecyclerView.

It works with a RecyclerView and a Callback class, which configures what type of interactions
are enabled and also receives events when user performs these actions.

ItemTouchHelperはRecyclerView Itemのswipe to dismissとdrag & dropをサポートするユーティリティである.

Depending on which functionality you support, you should override
onMove(RecyclerView, ViewHolder, ViewHolder) and / or onSwiped(ViewHolder, int).

This class is designed to work with any LayoutManager but for certain situations,
it can be optimized for your custom LayoutManager by extending methods in the
ItemTouchHelper.Callback class or implementing ItemTouchHelper.ViewDropHandler
interface in your LayoutManager.

どちらの機能をサポートするかで, onMove(RecyclerView, ViewHolder, ViewHolder), onSwiped(ViewHolder, int)のどちらか, あるいは両方をoverrideする.

このクラスはいくつかのLayoutManagerと協調し, 特定の状況下でうまく動作するようにデザインされている. カスタムLayoutManagerを作成する場合はItemTouchHelper.Callbackを拡張して最適化するかItemTouchHelper.ViewDropHandlerインタフェースをカスタムLayoutManagerに実装するかする.

By default, ItemTouchHelper moves the items’ translateX/Y properties to reposition them.
On platforms older than Honeycomb, ItemTouchHelper uses canvas translations and View’s
visibility property to move items in response to touch events.
You can customize these behaviors by overriding onChildDraw(Canvas, RecyclerView, ViewHolder, float, float, int, boolean) or onChildDrawOver(Canvas, RecyclerView, ViewHolder, float, float, int, boolean).

Most of the time, you only need to override onChildDraw but due to limitations of platform prior
to Honeycomb, you may need to implement onChildDrawOver as well.

標準ではItemTouchHelperはtranslateX/Yプロパティでアイテム項目を移動させる. Honeycombより古いプラットフォームではcanvasのtranslationとViewのvisibilityプロパティでアイテム項目を移動させる.
これらの振る舞いはonChildDraw(Canvas, RecyclerView, ViewHolder, float, float, int, boolean)かonChildDrawOver(Canvas, RecyclerView, ViewHolder, float, float, int, boolean)をオーバライドすることでカスタマイズできる.

多くの場合, onChildDrawのオーバライドのみが必要であるが, Honeycombより古いプラットフォームではonChildDrawOverの実装を必要とする場合がある.


ItemTouchHelper.Callback

android.support.v7.widget.helper.ItemTouchHelper.Callback

Class Overview

This class is the contract between ItemTouchHelper and your application. It lets you control which touch
behaviors are enabled per each ViewHolder and also receive callbacks when user performs these actions.

このクラスはあなたのアプリケーションとItemTouchHelperの間をとりもつクラスである. タップが有効なViewHolder毎の振る舞いを制御し, ユーザがそれらのアクションを起こした時のコールバックを受け取る.

To control which actions user can take on each view, you should override getMovementFlags(RecyclerView, ViewHolder) and return appropriate set of direction flags. (LEFT, RIGHT, START, END, UP, DOWN).
You can use makeMovementFlags(int, int) to easily construct it. Alternatively, you can use ItemTouchHelper.SimpleCallback.

ユーザがリスト項目に対してとれるアクションをコントロールするにはgetMovementFlags(RecyclerView, ViewHolder)メソッドをオーバーライドし, コントロール可能な方向を示すフラグ(LEFT, RIGHT, START, END, UP, DOWN)を返却する.
方向を示すフラグを簡単に作成するためにmakeMovementFlags(int, int)メソッドも用意されている.
あるいはItemTouchHelper.SimpleCallbackを使うこともできる.

If user drags an item, ItemTouchHelper will call onMove(recyclerView, dragged, target).
Upon receiving this callback, you should move the item from the old position (dragged.getAdapterPosition())
to new position (target.getAdapterPosition()) in your adapter and also call notifyItemMoved(int, int).

もし, ユーザがリスト項目をドラッグしたならば, ItemTouchHelperはonMove(recyclerView, dragged, target)を呼ぶ.
このコールバックう受け取った時, 古いポジション (dragged.getAdapterPosition())にあるリスト項目は新しいポジション(target.getAdapterPosition())に移動させ, それが終わるとnotifyItemMoved(int, int)を呼び出す必要がある.

When a dragging View overlaps multiple other views, Callback chooses the closest View with which dragged View might have changed positions.
Although this approach works for many use cases, if you have a custom LayoutManager, you can override
chooseDropTarget(ViewHolder, java.util.List, int, int) to select a custom drop target.

ドラッグ中のViewが他の複数のViewと重なった場合, コールバックにはより近くにあるViewのポジションがドロップ先のポジションとして渡される. このアプローチは多くのユースケースで有効に働くが, カスタムLayoutManagerを使用しており, これをカスタマイズしたい場合はchooseDropTarget(ViewHolder, java.util.List, int, int) でドロップ対象を変更することができる.

When a View is swiped, ItemTouchHelper animates it until it goes out of bounds, then calls
onSwiped(ViewHolder, int). At this point, you should update your adapter (e.g. remove the item) and
call related Adapter#notify event.

Viewがスワイプされた時, ItemTouchHelperは画面外に追い出すアニメーション効果をもたらす. この時onSwiped(ViewHolder, int)のコールバックが呼ばれる. この時点でRecyclerViewのAdapterを更新(例えば削除)し, Adapterのnotifyイベントを呼び出す必要がある.


ItemTouchHelper.SimpleCallback

android.support.v7.widget.helper.ItemTouchHelper.SimpleCallback

Class Overview

A simple wrapper to the default Callback which you can construct with drag and swipe directions and
this class will handle the flag callbacks. You should still override onMove or onSwiped depending on your use case.

ItemTouchHelper.Callbackのシンプルなラッパー. 指定されたフラグ(LEFT, RIGHT, START, END, UP, DOWN)に対するスワイプとドラッグのコールバックをハンドリングする. あなたのユースケースにあわせてonMoveとonSwipedをオーバライドする.

ItemTouchHelper mIth = new ItemTouchHelper(
     new ItemTouchHelper.SimpleCallback(ItemTouchHelper.UP | ItemTouchHelper.DOWN,
         ItemTouchHelper.LEFT) {
         public abstract boolean onMove(RecyclerView recyclerView,
             ViewHolder viewHolder, ViewHolder target) {
             final int fromPos = viewHolder.getAdapterPosition();
             final int toPos = viewHolder.getAdapterPosition();
             // move item in `fromPos` to `toPos` in adapter.
             return true;// true if moved, false otherwise
         }
         public void onSwiped(ViewHolder viewHolder, int direction) {
             // remove from adapter
         }
 });