翻訳ページ:
https://google.github.io/ExoPlayer/demo-application.html
Demo application
The ExoPlayer demo app serves two primary purposes:
- To provide a relatively simple yet fully featured example of ExoPlayer usage. The demo app can be used as a convenient starting point from which to develop your own application.
- To make it easy to try ExoPlayer. The demo app can be used to test playback of your own content in addition to the included samples.
This page describes how to get, compile and run the demo app. It also describes how to use it to play your own media.
ExoPlayerのデモアプリは次の2つの大きな理由のために用意してあります:
- シンプルでありながら全てのExoPlayer機能の使い方を例示していること. デモアプリがアプリ開発を始める際の開始点としてとして便利であること.
- ExoPlayerをお手軽に試すことができること. デモアプリにオリジナルコンテンツを追加して再生のテストにも使えること.
このページではどうやってデモアプリを取得し, コンパイルし, 実行するのかを説明します.
また, あなたが用意したメディアをどうやって再生するのかについても説明します.
Getting the code
The source code for the demo app can be found in the
demofolder of our GitHub project. If you haven’t already done so, clone the project into a local directory:
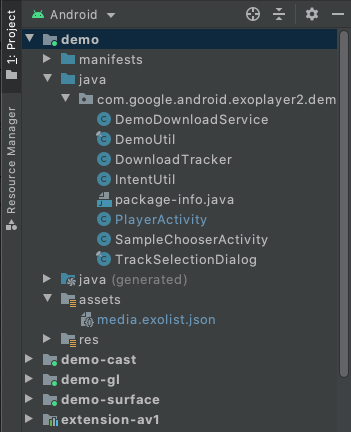
git clone https://github.com/google/ExoPlayer.gitNext, open the project in Android Studio. You should see the following in the Android Project view (the relevant folders of the demo app have been expanded):
デモアプリのソースコードはGitHubプロジェクトから取得できます. まだ取得していないのであればローカルディレクトリにcloneしてください.
git clone https://github.com/google/ExoPlayer.git
次に, AndroidStudioでAndroid Projectビューを開くと次の表示を確認できます.
Compiling and running
To compile and run the
demoapp, select and run the demo configuration in Android Studio. The demo app will install and run on a connected Android device. We recommend using a physical device if possible. If you wish to use an emulator instead, please read FAQ - Does ExoPlayer support emulators? and ensure that your Virtual Device uses a system image with an API level of at least 23.
AndroidStudioのConfigurationからdemoを選択し, デモアプリをコンパイル, 実行してください. 接続されているデバイスにデモアプリがインストールされて実行されます. 可能であればエミュレータではなく物理的なデバイスの使用を推奨します.
もし代わりにエミュレータを使用したいのであればFAQ - Does ExoPlayer support emulators?を読んでください. そうすればAPI lv23以降の仮想デバイスで使うことができます.
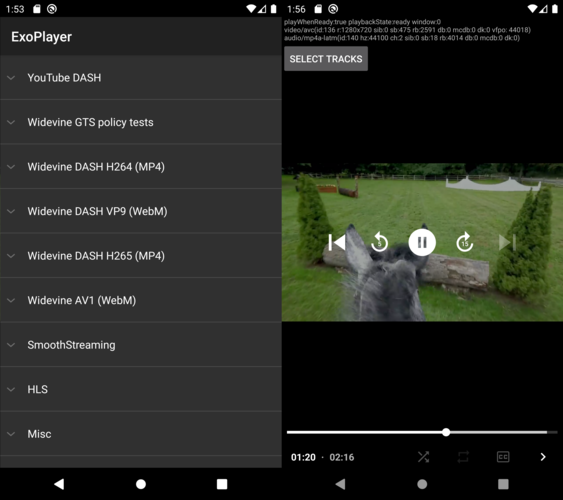
The demo app presents of a list of samples (
SampleChooserActivity). Selecting a sample will open a second activity (PlayerActivity) for playback. The demo features playback controls and track selection functionality. It also has anEventLoggerclass that outputs useful debug information to the system log. This logging can be viewed (along with error level logging for other tags) with the command:
デモアプリのSampleChooserActivityにサンプルのリストがあります. リスト項目を選択すればそれを再生するためのPlayerActivityが起動します. デモは再生コントロールとトラック選択の機能を持っています. また, システムログに有用なデバッグ情報を出力するEventLoggerクラスを持っています. 次のコマンドでEventLoggerの有効にして, ほかのログはエラー情報のみ表示することができます.
adb logcat EventLogger:V *:E
Including extension decoders
ExoPlayer has a number of extensions that allow use of bundled software decoders, including VP9, Opus, FLAC and FFMPEG (audio only). The demo app can be built to include and use these extensions as follows:
- Build each of the extensions that you want to include. Note that this is a manual process. Refer to the
README.mdfile in each extension for instructions.- In Android Studio’s Build Variants view, change the build variant for the demo module from
demoDebugtodemo_extDebug, as shown in Figure 3.- Compile, install and run the
democonfiguration as normal.
ExoPlayerはいくつかのエクステンションがありVP9, Opus, FLAC and FFMPEG (audio only)といったソフトウェアデコーダを使うことができます. デモアプリでこれらを使うための手順は次の通りです:
- 取り込みたいExtensionをビルドします. これは手作業での変更になります. それぞれのExtensionにあるReadmeには手順が示されています.
- Figure 3を参考に, AndroidStudioのビルドバリアントビューでデモモジュールのビルドバリアントを
demoDebugからdemo_extDebugに切り替えます. - いつもの通りデモをコンパイル, インストール, 実行します.
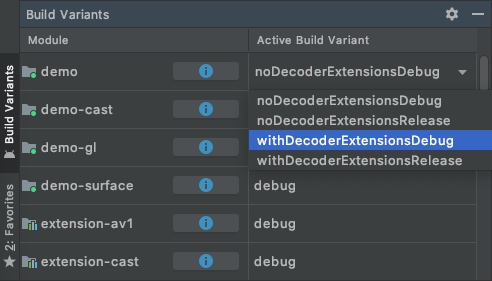
Figure 3. Selecting the demo_extDebug build variant
By default an extension decoder will be used only if a suitable platform decoder does not exist. It is possible to indicate that extension decoders should be preferred, as described in the sections below.
デフォルトのデコーダ拡張は適切なプラットフォームデコーダが存在しない時だけ使われる。これはのそセクションで拡張デコーダが望ましいことを示すことができる。
Playing your own content
There are multiple ways to play your own content in the demo app.
デモアプリで手持ちのコンテンツを再生するにはいくつかの方法があります.
1. Editing assets/media.exolist.json
The samples listed in the demo app are loaded from
assets/media.exolist.json. By editing this JSON file it’s possible to add and remove samples from the demo app. The schema is as follows, where [O] indicates an optional attribute.
デモアプリではasset/media.exolist.jsonから読み込まれたサンプルコンテンツがリストされています. このJSONファイルを編集することでこれらのサンプルに追加したり削除したりすることができます. JSONの形式は次の通り. [O]はオプションの属性です.
[
  {
    "name": "Name of heading",
    "samples": [
      {
        "name": "Name of sample",
        "uri": "The URI/URL of the sample",
        "extension": "[O] Sample type hint. Values: mpd, ism, m3u8",
        "prefer_extension_decoders": "[O] Boolean to prefer extension decoders",
        "drm_scheme": "[O] Drm scheme if protected. Values: widevine, playready",
        "drm_license_url": "[O] URL of the license server if protected",
        "drm_key_request_properties": "[O] Key request headers if protected"
      },
      ...etc
    ]
  },
  ...etc
]
Playlists of samples can be specified using the schema:
サンプルのプレイリストはスキーマを使って特定できる.
[
  {
    "name": "Name of heading",
    "samples": [
      {
        "name": "Name of playlist sample",
        "prefer_extension_decoders": "[O] Boolean to prefer extension decoders",
        "drm_scheme": "[O] Drm scheme if protected. Values: widevine, playready",
        "drm_license_url": "[O] URL of the license server if protected",
        "drm_key_request_properties": "[O] Key request headers if protected"
        "playlist": [
          {
            "uri": "The URI/URL of the first sample in the playlist",
            "extension": "[O] Sample type hint. Values: mpd, ism, m3u8"
          },
          {
            "uri": "The URI/URL of the first sample in the playlist",
            "extension": "[O] Sample type hint. Values: mpd, ism, m3u8"
          },
          ...etc
        ]
      },
      ...etc
    ]
  },
  ...etc
]
If required, key request headers are specified as an object containing a string attribute for each header:
もし必要なら, それぞれのヘッダに文字列を含むオブジェクトのキーリクエストヘッダを指定できます.
"drm_key_request_properties": {
  "name1": "value1",
  "name2": "value2",
  ...etc
}
2. Loading an external exolist.json file
The demo app can load external JSON files using the schema above and named according to the
*.exolist.jsonconvention. For example if you host such a file athttps://yourdomain.com/samples.exolist.json, you can open it in the demo app using:
デモアプリは上記のスキーマを使った*.exolist.jsonにマッチするJSONを読み込むことができます. もしファイルをhttps://yourdomain.com/samples.exolist.jsonでホストしているならデモアプリを使って次のコマンドで開くことができます.
adb shell am start -d https://yourdomain.com/samples.exolist.json
Clicking a
*.exolist.jsonlink (e.g. in the browser or an email client) on a device with the demo app installed will also open it in the demo app. Hence hosting a*.exolist.jsonJSON file provides a simple way of distributing content for others to try in the demo app.
ブラウザやemailクライアントで*.exolist.jsonのリンクをクリックするとデモアプリがインストールされていれば起動することができます. デモアプリで試すには*.exolist.jsonのJSONファイルをホストするのがコンテンツを他へ配信するのに簡単な方法です.
3. Firing an intent
Intents can be used to bypass the list of samples and launch directly into playback. To play a single sample set the intent’s action to
com.google.android.exoplayer.demo.action.VIEWand its data URI to that of the sample to play. Such an intent can be fired from the terminal using:
Intentはサンプルリストをバイパスするのと直接再生することに使えます. 1つのサンプルセットを再生するにはアクションcom.google.android.exoplayer.demo.action.VIEWとデータのURIが設定されたIntentを使います. そうしたIntentをターミナルから発行するには次のコマンドを使います.
adb shell am start -a com.google.android.exoplayer.demo.action.VIEW \
    -d https://yourdomain.com/sample.mp4
Supported optional extras for a single sample intent are:
extension[String] Sample type hint. Valid values: mpd, ism, m3u8prefer_extension_decoders[Boolean] Whether extension decoders are preferred to platform onesdrm_scheme_uuid[String] Drm scheme UUID if protecteddrm_license_url[String] Url of the license server if protecteddrm_key_request_properties[String array] Key request headers packed as name1, value1, name2, value2 etc. if protected
IntentがサポートしているオプショナルなExtraは次の通り:
extension[String] サンプルの種類. 使える値は mpd ism m3u8prefer_extension_decoders[Boolean] extensionデコーダーがプラットフォームに適しているかどうかdrm_scheme_uuid[String] 保護されている場合のDrm形式のUUIDdrm_license_url[String] 保護されている場合のライセンスサーバーURLdrm_key_request_properties[String array] 保護されている場合, name1, value1, name2, value2の形でパッケージされたキーリクエストヘッダ
When using
adb shell am startto fire an intent, an optional string extra can be set with--es(e.g.--es extension mpd). An optional boolean extra can be set with--ez(e.g.--ez prefer_extension_decoders TRUE). An optional string array extra can be set with--esa(e.g.--esa drm_key_request_properties name1,value1).
Intentの発行にadb shell am startを使うなら, Extraオプションの文字列は--es (e.g. --es extension mpd)で指定できる. booleanであれば--ez (e.g. --ez prefer_extension_decoders TRUE). String配列であれば--esa (e.g. --esa drm_key_request_properties name1,value1)を使って設定することができる.
To play a playlist of samples set the intent’s action to
com.google.android.exoplayer.demo.action.VIEW_LISTand use auri_liststring array extra instead of a data URI. For example:
サンプルのプレイリストを再生するにはIntentのアクションcom.google.android.exoplayer.demo.action.VIEW_LISTと文字配列uri_listにデータURIを指定します. 例えば,
adb shell am start -a com.google.android.exoplayer.demo.action.VIEW_LIST \
    --esa uri_list https://a.com/sample1.mp4,https://b.com/sample2.mp4
Supported optional extras for a playlist intent are:
プレイリストのIntentでサポートされているオプションは次の通り:
extension_list[String array] Sample type hints. Entries may be empty or one of: mpd, ism, m3u8prefer_extension_decoders,drm_scheme_uuid,drm_license_urlanddrm_key_request_properties, all as described above
extension_list[String array] サンプルタイプのヒント. 内容は空かmpd, ism, m3u8のうちどれかですprefer_extension_decoders,drm_scheme_uuid,drm_license_urlとdrm_key_request_propertiesそれぞれは上記で説明されています.