2016/03/09

Android: Hugo

メソッドのIn, Outとパラメータ, リターン値をログ出力するコードをアスペクトするライブラリ.
https://github.com/JakeWharton/hugo

ログ出力したいクラス/メソッドに@DebugLogでアノテートすることで使用できる.

// クラス単位での指定が可能
@DebugLog
public class Hobbit {
  ...
}
// メソッド単位での指定も可能
@DebugLog
public String getName(String first, String last) {
  SystemClock.sleep(15); // Don't ever really do this!
  return first + " " + last;
}
V/Example: ⇢ getName(first="Jake", last="Wharton")
V/Example: ⇠ getName [16ms] = "Jake Wharton"

Hugoの無効化

BuildVariantのdebuggablefalse.

release {
    debuggable false
}

または, Hugo単体で無効化できる.

hugo {
    enabled  false
}

@DebugLogの作用は上記で無効化すればソフトウェアへの影響を0にできる.
もし実行時にHugoのOn/Offを切り替えるのであれば次の方法が使える.

Hugo.setEnabled(true|false)

Gradle console.
Debuggable falseによる無効化
“Skipping non-debuggable build type …”

hugo.enabled falseによる無効化
“Hugo is not disabled.”

導入

buildscript {
  repositories {
    mavenCentral()
  }

  dependencies {
    classpath 'com.jakewharton.hugo:hugo-plugin:1.2.1'
  }
}

apply plugin: 'com.android.application'
apply plugin: 'com.jakewharton.hugo'

以上です.

2016/03/06

Android: Gradle Project Report

Gradle標準にビルド時のプロジェクト状態をレポートするProject Reports Pluginがあります.
本稿はこのプラグインを使ってみたレポートです.

公式ドキュメントにあるObtaining information about your buildで触れられているいくつかのコマンドをGradleのタスクとして定義できます.
導入は非常に簡単で apply plugin: 'project-report' を宣言するだけです.

これにより追加されるタスクについて紹介します.

DependencyReport

プロジェクトの依存関係ツリーをテキストファイル形式でレポートするタスクです.
レポートはbuild/reports/projectフォルダ配下に出力されます.

このタスクはコマンドラインで下記を実行した結果と等価です.

./gradlew dependencies

下記のような結果が得られます.

------------------------------------------------------------
Project :app
------------------------------------------------------------

_debugAndroidTestApk - ## Internal use, do not manually configure ##
No dependencies

_debugAndroidTestCompile - ## Internal use, do not manually configure ##
No dependencies

_debugApk - ## Internal use, do not manually configure ##
+--- com.android.support:appcompat-v7:23.1.1
|    \--- com.android.support:support-v4:23.1.1
|         \--- com.android.support:support-annotations:23.1.1
+--- com.android.support:design:23.1.1
|    +--- com.android.support:appcompat-v7:23.1.1 (*)
|    +--- com.android.support:recyclerview-v7:23.1.1

Androidでは依存性の推移で問題が発生する機会が多く, これを解決するためによく使われるコマンドです.

参考: 気をつけたいGradleの推移的依存関係とその解決 - Qiita

HtmlDependencyReport

プロジェクトの依存関係ツリーをHTML形式でレポートするタスクです.
レポートはbuild/reports/project/dependenciesフォルダ配下に出力されます.

(このレポート形式が見やすいのかは別として…)
デフォルト設定だと, 各モジュール毎にHTMLレポートの出力を行う必要があります.
もし, 複数のモジュールを扱うプロジェクトであれば, ルートのbuild.gradleに下記を定義することでプロジェクト全体を対象としたレポートを出力できます.

apply plugin: 'project-report'
htmlDependencyReport {
    projects = project.allprojects
}

PropertyReport

プロジェクトのプロパティをテキストファイル形式でレポートするタスクです.
レポートはbuild/reports/projectフォルダ配下に出力されます.

このタスクはコマンドラインで下記を実行した結果と等価です.

./gradlew properties

下記のような結果が得られます.

------------------------------------------------------------
Project :app
------------------------------------------------------------

allprojects: [project ':app']
android: com.android.build.gradle.AppExtension_Decorated@1526742
android.injected.invoked.from.ide: true
androidDependencies: task ':app:androidDependencies'
ant: org.gradle.api.internal.project.DefaultAntBuilder@1ef6195
...

TaskReport

プロジェクトのタスク一覧をテキストファイル形式でレポートするタスクです.
レポートはbuild/reports/projectフォルダ配下に出力されます.

このタスクはコマンドラインで下記を実行した結果と等価です.

./gradlew tasks

下記のような出力結果が得られます.

------------------------------------------------------------
All tasks runnable from project :app
------------------------------------------------------------

Android tasks
-------------
androidDependencies - Displays the Android dependencies of the project.
signingReport - Displays the signing info for each variant.
sourceSets - Prints out all the source sets defined in this project.

Build tasks
-----------
assemble - Assembles all variants of all applications and secondary packages.
assembleAndroidTest - Assembles all the Test applications.
assembleDebug - Assembles all Debug builds.
...

ProjectReport

ここまで紹介したdependencyReport, propertyReport, taskReport, htmlDependencyReportを全て実行するショートカットタスクです.

各レポートタスクの共通設定が可能です.

projectReportDir
プロジェクトレポートの出力場所を指定する.
projectReportDirName
プロジェクトレポートの出力先フォルダ名を指定する.
projectReport {
    projectReportDirName = "project_reports"
}

以上です.

2016/03/05

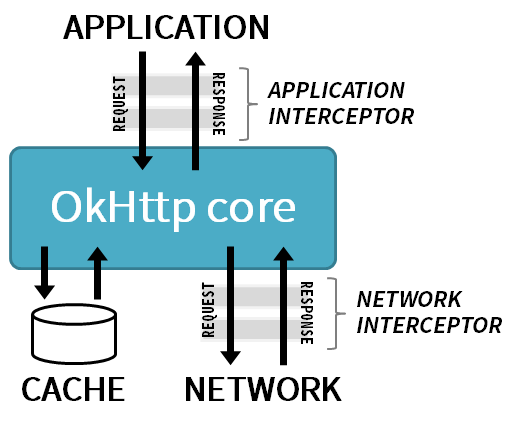
OkHttp Interceptor

本稿ではOkHttpのApplication InterceptorとNetwork Interceptorの役割について書きました.
内容はOkHttp公式wiki - Interceptorsと被っていますが, メモとして残します.

Interceptor

OkHttpでは処理に割り込めるポイントが2つあり, 必要に応じて使い分けます.

OkHttp Interceptor

アプリケーションとOkHttpとのコミュニケーションに割り込むInterceptorをApplicationInterceptor, OkHttpとネットワークとのコミュニケーションに割り込むInterceptorをNetworkInterceptorと呼びます.

これらはOkHttpClient.Builderを経由して設定できます.

OkHttpClient client = new OkHttpClient.Builder()
    .addInterceptor(new LoggingInterceptor())
    .addNetworkInterceptor(new LoggingInterceptor())
    .build();

挙動の違い

OkHttpはアプリケーションが楽できるように様々な処理を代行します.

Redirect, Retryの処理はアプリとのコミュニケーションなしに, OkHttpに閉じて行われます.
そういったアプリとのコミュニケーションが発生しないケースではApplicationInterceptorが使えません.

Redirect, Retryの処理はネットワークとのコミュニケーションになります. ここへ割り込むにはNetworkInterceptorが使えます.
ただし, Cacheレスポンスが働く場合はネットワークとのコミュニケーションが発生しません.
そういったネットワークとのコミュニケーションが発生しないケースではNetworkInterceptorが使えません.

各Interceptorのポイントを下記に纏めます.

ApplicationInterceptor

  • RedirectやRetryといった中間応答には反応できない
  • Cacheレスポンスにも反応する
  • アプリケーションが発行するオリジナルリクエストが監視対象

NetworkInterceptor

  • RedirectやRetryといった中間応答にも反応できる
  • Cacheレスポンスには反応できない
  • ネットワークへ発行されるリクエストが監視対象

監視対象リクエストについて. OkHttpはアプリからのリクエストを加工して通信します.
この時, アプリからリクエストされたオリジナルの内容はApplicationInterceptorが補足します.
その後, OkHttpが加工したリクエストはNetworkInterceptorが補足します.

client.newCall(new Request.Builder()
        .url(url)
        .build())
        .execute();

上記の単純なGETリクエストを投げるコードで, ApplicationInterceptor, NetworkInterceptorそれぞれにHttpLoggingInterceptorを設定した場合のログ出力を確認します.

// ApplicationInterceptorによる出力
--> GET http://127.0.0.1:54817/ http/1.1
--> END GET

// NetworkInterceptorによる出力
--> GET http://127.0.0.1:54817/ http/1.1
Host: 127.0.0.1:54817
Connection: Keep-Alive
Accept-Encoding: gzip
User-Agent: okhttp/3.2.0
--> END GET

リクエストを加工する工程がみて取れました.

他にも, OkHttpにCookie管理を任せてCookieヘッダをログで確認したい場合はNetworkInterceptorを使います.

CookieManager cookieManager 
    = new CookieManager(null, ACCEPT_ORIGINAL_SERVER);
CookieHandler.setDefault(cookieManager);

server.enqueue(new MockResponse()
    .addHeader("Set-Cookie: a=hoge;")
    .addHeader("Set-Cookie: b=foo;"));
server.enqueue(new MockResponse());

client = client.newBuilder()
    .cookieJar(new JavaNetCookieJar(cookieManager))
    .build();

requestGet(urlWithIpAddress(server, "/"));
--> GET http://127.0.0.1:56899/ http/1.1
Host: 127.0.0.1:56899
Connection: Keep-Alive
Accept-Encoding: gzip
Cookie: a=hoge; b=foo
User-Agent: okhttp/3.2.0
--> END GET

以上です.

2016/03/01

Android: Dagger2

本稿はDI FrameworkとDagger2.0の概要になります.
対象読者は下記です.

  • DI Frameworkを使ったことがない人.
  • Dagger2の初学者

スライドの下書きから起こしたものなのであしからず…

依存性

  • 具象クラスとの関連は結合度を高める
  • インタフェースに依存させたいが, “new“が具象クラスへの依存性を生む
GitHubStore store = new GitHubDatabase();

制御の反転

依存性解決の方向を反転させれば解決する.

GitHub => new GitHubDatabase

   ↓ 反転 ↓

GitHub <= new GitHubDatabase

GitHubクラスが依存オブジェクトを決めるのではなく, GitHubクラスの依存オブジェクトを外から指定する.

class GitHub {
    // GitHubクラス自身が依存性を生む
    private GitHubStore store = new GitHubDatabase();


 ↓ refactoring↓


class GitHub {
    GitHub(GitHubStore store) {...}
}

class Client { ...
    public doSomething() {
        // GitHubクラスの利用側が依存性を注入する
        new GitHub(new GitHubDatabase());
  • 制御の反転. Inversion of Control
  • ハリウッドの原則. Hollywood Principle

new, new, new…

制御を反転させるだけではオブジェクトを生成するコードがプロジェクト中に散在する.

ClientA:
    new GitHub(new GitHubDatabase());

ClientB:
    setDatabase(new GitHubDatabase());

ClientC:
    create(new GitHubDatabase());

これは下記の問題を引き起こす.

  • 柔軟性がない
  • テストしづらい

もし, 永続化先をディスク領域に格納されるデータベースから, オンメモリキャッシュに変更したい場合, new GitHubDatabase()のコードを new GitHubMemcached()に置き換えなければならない.

ClientA:
    new GitHub(new GitHubMemcached());

ClientB:
    setDatabase(new GitHubMemcached());

ClientC:
    build(new GitHubMemcached());

これは簡易な例で, 実際には生成オブジェクトの初期化や組み立てといったコードが散在することになり, それらを全て置換するのには骨が折れる.
アーキテクチャのレイヤー境界面も曖昧になり, テストの際に実装の詳細を差し替えられない.

Factory Pattern

生成処理をFactoryに委譲することで, これらの問題を軽減できる.

class GitHubStoreFactory {
    public GitHubStore get() {
        return new GitHubDatabase();
    }
}

ClientA:
    new GitHub(GitHubStoreFactory.get());

ClientB:
    setDatabase(GitHubStoreFactory.get());

ClientC:
    build(GitHubStoreFactory.get());
Factory委譲前: 
    [Client]---->[GitHubStore]
       |
       ---new--->[GitHubDatabase]


Factory委譲後: 
    [Client]---->[GitHubStore]<---[GitHubDatabase]
       |                               
       ---get--->[Factory]-----new------

Factoryを経由すればClientはインタフェース(GitHubStore)にだけ依存する.

Factoryの問題

Factory Patternは問題の全てを解決してくれない.
Factory関連のクラスは次の問題に悩まされる.

  • 数多のクラスからオブジェクト生成を委譲され肥大化する.
  • オブジェクトの生成順序, 構築方法にも関心を持つ責務過多.
  • 膨大なボイラープレートコードが出来上がる
  • SharedObject? Singleton?
  • Lifecyle, Scopeの管理が必要になることもある

下記のようなコードがプロジェクト中に散在する.

Factory factory = new Cupcake.Factory(type, key);
factory.get();
Factory factory = new Donut.Factory(type, key);
factory.get();
Factory factory = new Eclair.Factory(type, key);
factory.get();
Factory factory = new Froyo.Factory(type, key);
factory.get();
Factory factory = new Gingerbread.Factory(type, key);
factory.get();
Factory factory = new Honeycomb.Factory(type, key);
factory.get();

DI Framework

こうした問題を軽減, 解決してくれるのが依存性注入に特化したDI Frameworkである.

DI Frameworkのメリット

  • アーキテクチャのレイヤーをきれいに分離できる
  • 依存オブジェクトの管理を委譲できる
  • 柔軟なソフトウェアになる
  • ボイラープレートコードを排除できる
  • テストしやすいソフトウェアになる

DI Frameworkのデメリット

  • ラーニングコストがかかる
  • 自動生成コード含め, クラスの数が多くなる
  • Frameworkの特性にあわせた依存性の管理

Dagger2

DI Frameworkの実装としてDagger2がある.
Dagger2の特徴は下記の通り.

  • DI Framework for Java & Android
  • No XML Configuration.
  • 高速
  • Annotation Processingベースでデバッグしやすい
  • コンパイル時に依存性の検証を行う
  • Googleがメンテナ

依存性の要求

Dagger2に依存オブジェクトを要求するには, 依存性を注入したい箇所に@Injectでアノテートする.

GitHubDatabase store = new GitHubDatabase();

 ↓ refactoring ↓

// フィールドstoreへの依存性注入をDagger2へ要求する
@Inject GitHubDatabase store;
GitHub(new GitHubDatabase()) {...}

 ↓ refactoring ↓

// 引数storeへの依存性注入をDagger2へ要求する
@Inject GitHub(GitHubDatabase store) {...}

依存オブジェクトの要求を受けたDagger2は適切なオブジェクトをそこに注入する.

@Inject GitHubDatabase store;

               ↑ inject ↑

// Dagger2はGitHubDatabaseを生成して依存性を注入する
Dagger2: new GitHubDatabase();
@Inject GitHub(GitHubDatabase store) {...} 

               ↑ inject ↑

// Dagger2はGitHubDatabaseを生成して依存性を注入する
Dagger2: new GitHubDatabase();

依存性の注入には種類がある.

  • Constructor Injection
  • Field Injection
  • (Setter Injection) Dagger2では未サポート

依存性の解決

Dagger2は依存オブジェクトをどのように解決しているのか.

@Inject GitHub(GitHubDatabase store) {...} 

                  ↑ inject ↑

Dagger2: new GitHubDatabase();
         ~~~~~~~~~~~~~~~~~~~~~
         Whats happen!?

依存性の要求は, Dagger2管理下にある依存オブジェクトのコレクションから選択・解決される.
Constructorに@InjectアノテートをつけるとDagger2がこれを管理対象として収集する.

class GitHubDatabase {
    // Dagger2管理対象として登録
    @Inject GitHubDatabase() {...}
}
@Inject GitHubDatabase() {...}
  |
  | <登録>
  ↓
Dagger2
  |
  | <注入>
  +-------> @Inject GitHub(GitHubDatabase db)
  |
  | <注入>
  +-------> @Inject GitHubDatabase db;

依存性の充足

Constructorへの@Injectだけでは依存性を解決できないケースがある.

  • インタフェースへの注入(具体化)
  • プロジェクト管理外クラスの注入
  • オブジェクトの構築を伴う生成, 及び注入

これらを含む依存性を充足させるにはProviderと呼ばれるファクトリメソッドを作る.

@Provides

  • インタフェースへの注入(具体化)
@Provides
GitHubStore provideGitHubStore() {
  return new GitHubDatabase();
}

OR...

@Provides
GitHubStore provideGitHubStore(GitHubDatabase store) {
  return store;
}
  • プロジェクト管理外クラスの注入
  • オブジェクトの構築を伴う生成, 及び注入
@Provides
Retrofit provideGitHubRetrofit() {
  return new Retrofit.Builder()
      .baseUrl("https://api.github.com")
      .addConverterFactory(GsonConverterFactory.create())
      .build();
}

@Module

@Providesはモジュールクラス(@Module)のメソッドとして定義する.

@Module
class ApplicationModule {
    @Provides
    GitHubStore provideGitHubStore(GitHubDatabase store) {
        return store;
    }
}

Building the Graph

依存性のコレクションはGraphと呼ばれる.

 RepositoryViewer
     |
     |
   GitHub
     |
     |--------------------+
     |                    |
 GitHubWebApi       GitHubDatabase
     |                    |
     |                    |
  Retrofit               Orma

Graphの設計図としてコンポーネントクラス(@Component)が必要になる.

@Component(modules=ApplicationModule.class)
interface ApplicationComponent {...}

GraphはComponent単位で生成・管理される.
Dagger2が管理するGraphにアクセスするにはComponentを経由する.

// Graphの取得. 
// ApplicationComponentインスタンスに依存オブジェクトが保持されている.
ApplicationComponent component 
    = DaggerApplicationComponent.builder()
        .applicationModule(new ApplicationModule())
        .build();

Sample code.

GitHub - Dagger2Sample

  • app : Dagger2を使った基本的なsample
  • subcomponent : Subcomponentとdependenciesのsample(後述)

テストとアーキテクチャ

DIが促進するもの.

  • アーキテクチャにおける”レイヤー”を綺麗に分離することができる
  • レイヤーが独立し, レイヤーごと差し替えるといったことが容易
 RepositoryViewer
     |
   GitHub
     |
     |--------------------+
     |                    |
 GitHubWebApi       GitHubDatabase
     |                    |
  Retrofit               Orma


  ↓ Databaseをやめてオンメモリ管理 ↓


 RepositoryViewer
     |
   GitHub
     |
     |--------------------+
     |                    |
 GitHubWebApi      GitHubMemcached*
     |
  Retrofit

これらはテストの際に役立つ.

  • テストは検証用モジュールで実施したい.
  • Amazon Device Farm上ではテスト時間短縮のため, オンメモリDBで動作させたい. etc.

上記の詳細はSample codeを参照.

補足

これ以降はDagger2の補助機能.

Graphの操作

ComponentはGraph単位の操作を定義できる.

  • Graphが属するScopeの宣言
  • 依存性注入のポイントを外部公開
  • 他Componentへの依存

Instant Injection

Graph生成後に, 特定オブジェクトの依存性を充足させる.

@Component(...)
interface ActivityComponent {
    void inject(RepositoryViewerActivity activity);
}

class RepositoryViewerActivity extends Activity {
    @Inject GitHub github;

    protected void onCreate(Bundle b) {
        ActivityComponent component 
            = DaggerActivityComponent.builder()
            ...
        component.inject(this);  // inject GitHub dependency.
    }
}

Scope

依存オブジェクトのライフサイクルを指定する.

  • Application単位のSingleton性を持たせる
  • Activity単位のSingleton性を持たせる etc.
@Singleton
class GitHubDatabase {...}

// Custom Scopeも定義可能
@ActivityScope
class GitHub {...}

Qualifier

依存性の注入先に識別子を付ける.
同じ型の依存性解決に使用される.

public GitHub(...,
    @Named("executionScheduler") Scheduler executionScheduler,
    @Named("postScheduler") Scheduler postScheduler) {

@Named("executionScheduler")
@Provides @ActivityScope
public Scheduler provideExecutionScheduler() {
    return Schedulers.newThread();
}

@Named("postScheduler")
@Provides @ActivityScope
public Scheduler providePostScheduler() {
    return AndroidSchedulers.mainThread();
}

Lazy injections

  • 依存性の注入タイミングをオブジェクト取得時まで遅らせる遅延初期化
@Inject Lazy<GitHub> github;

// このタイミングで依存オブジェクトが初期化される
github.get().findRepository(...);

Provider injections

  • 依存性注入の都度newするnon-cached指定
@Provides LocalTime provideLocalTime() {
    return LocalTime.now();
}

@Inject Provider<LocalTime> localTimeProvider;

localTimeProvider.get();  // 常に最新の時刻が取れる.

Subcomponent

  • ComponentAとComponentBに親子関係を持たせる
  • ComponentA+ComponentBのGraphをつくる
@Component(...)
public interface ParentComponent {
    ChildComponent newChildComponent(...);
}

@Subcomponent(...)
public interface ChildComponent {...}

dependencies

  • ComponentAとComponentBに使用関係を持たせる
  • ComponentA+ComponentBのGraphをつくる
@Component(dependencies = DependeeComponent.class, ...)
public interface DependerComponent {...}

@Component(...)
public interface DependeeComponent {...}

以上.